As the Lupus Foundation of America ushers in part 3 of my guest blog today, I did a little reminiscing.
I can hardly believe that only a few years ago, I took my first stab at low sodium cooking with a simple stir fry. A few ripe vegetables, a quick chop, a sizzle of vegetable oil (as I had not yet discovered the power of toasted sesame), some slivers of organic chicken, and a few dashes of salt-free granulated garlic and cayenne, and I had a dinner that was fresh, springy, unfussy, and sodium free. It was minimal, but it was perfect.
With the confidence and the success of that first dish, I began to explore more possibilities, playing with new spices (oh, hello curry powder), new ingredients (paneer, sunchokes, and beets, oh my), and new techniques (roast, toast, grate, and eat). I quickly found that nothing – not even a roll of home-made maki – was beyond my low sodium capabilities. And, although most recipes take some time to develop and perfect, I truly enjoyed the experimentation, the failures and successes, that come along with seasoning sans salt.
Today, I attack the challenge of replacing soy and salty peanut sauces with the same fervor that I cooked that original stir fry – a recipe which also continues to transform alongside my culinary maturing. Whether it is Puerto Rican pulpos, Yakisoba, cold avoacado and crab(free) soup, or ricotta cheese gnocchi (post to come next week), I have learned that my sodium restrictions have not limited my recipes (or my life); but my needs have made them more exciting.
And from cooking beyond the boundaries, I have also realized that with enough passion and persistance, anyone can cook. Please note that I said cook, not bake, as that is still one hurdle this Sodium Girl has yet to overcome. Not because it isn’t possible without salt. Just because I hate following recipes.
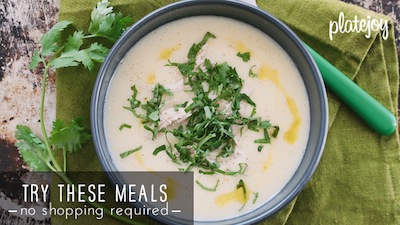
For those that do like following recipes, though, here is one of my favorites and a great place to start if you are just delving into a low sodium diet: Caramelized Fennel Corn Chowder (seen above). Grab your blender and a few bulbs of the licorice-ish greenery, and see how, with the right ingredients and the right cooking methods, there is enough flavor to feed the world twice, without the need for salt.
Chow down and soup on.
Ingredients:
- 1 head of garlic, roasted
- 1 bulb of fennel, diced or sliced, either way it’s getting blended
- 1 ½ cups of frozen corn
- 1 teaspoon of olive oil
- 1 cup of water
- 1 tablespoon of heavy cream (0 mg of sodium)
- fresh herbs, chives and parsley work well, roughly chopped or torn
- 2 slices of low sodium bread (10 mg of sodium per slice), cut into 1/2 inch squares and toasted
Directions:
Spoiler alert: this recipe was so quick because I had already roasted the garlic for a dinner party the night before. To roast the garlic, cut off the tops of the entire head of garlic and put into a little boat made of tinfoil. Drizzle a teaspoon of olive oil onto the garlic and throw it into an oven on 375 degrees for 40 minutes or until the garlic is soft. If you are in a rush though, skip the roasted garlic step and simply sauté in some olive oil in your soup pot on medium heat.
1. Heat the tablespoon of olive oil in your soup pot over medium heat. When hot, add the fennel (and garlic if you are not roasting it). Stir constantly and allow the fennel to soften and turn to a nice, brown caramel color. Should take 5 minutes.
2. Add the corn and allow it to soften for another 5 minutes.
3. Add the roasted garlic (if you roasted ahead of time) and the cup of water. Allow to simmer for 15-20 minutes to draw out the flavors.
4. Take pot off of the flame and plug in your immersion blender or transfer soup to your standing blender. Blend on low to medium for 2 minutes or until the consistency is nice and creamy. You can always add an extra step of running the soup through a sieve if you want it to be absolutely silky smooth.
5. Put pot back on the burner, return soup to pot if you used a standing blender, and turn flame to low to reheat. 5 minutes before serving/eating, add the cream and stir.
6. Ladle steaming soup into a gigantic bowl or cup and top with fresh herbs, croûtons, and pepper flakes if desired.


